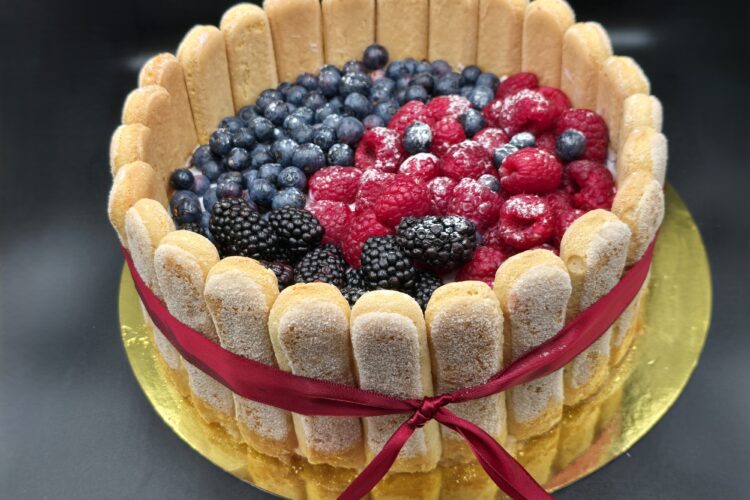
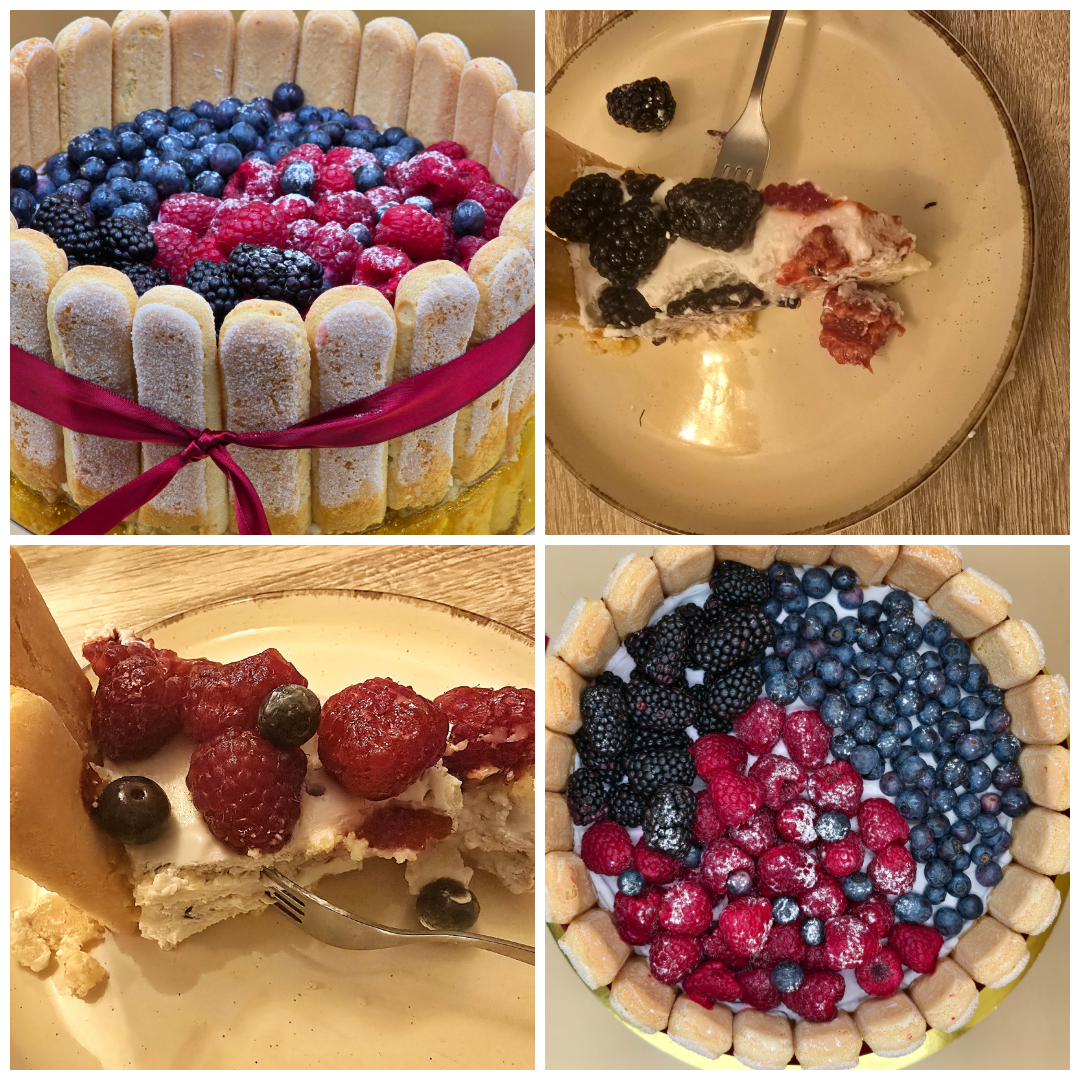
This elegant no-bake Berry Charlotte Cake with ladyfingers, mascarpone, and sour cream features a delicate cookie crust, a light and creamy filling, and layers of fresh seasonal berries. Perfect for summer celebrations or festive occasions, this visually stunning cake is easy to prepare and guaranteed to impress.
Fantastic Berry Charlotte Cake with Ladyfingers and Mascarpone (Video)
Course: Recipes, Desserts12
servings30
minutes12
hours290
kcal12
hours30
minutesIf you’re looking for a show-stopping dessert that’s both easy to make and visually impressive, this Berry Charlotte Cake with ladyfingers, mascarpone, and sour cream is the perfect recipe. The dessert is inspired by the classic Charlotte cake — a French and British creation dating back to the 18th century, typically made with a mold lined with ladyfingers or sponge cake and filled with a light mousse, custard, or fruit purée.
In this version, the combination of crushed ladyfingers and butter forms a firm and flavorful base, while the upright ladyfingers create a beautiful and stable wall around the cake. The filling is a smooth blend of mascarpone cheese, sour cream, and just enough gelatin to hold everything together while remaining soft and mousse-like in texture. With layers of berries in the center and a vibrant topping of fresh fruit, the result is a summery, festive dessert that feels as luxurious as it looks.
Kitchen Tools You’ll Need
20 cm (8-inch) springform ring
Cake board or the base of a springform pan
Blender or food processor
Mixing bowls (small and large)
Electric hand mixer
Silicone spatula
Tablespoon and teaspoon
Small saucepan or microwave-safe bowl (for gelatin)
Ribbon (for decoration, optional)
Ingredients
- For the crust and structure
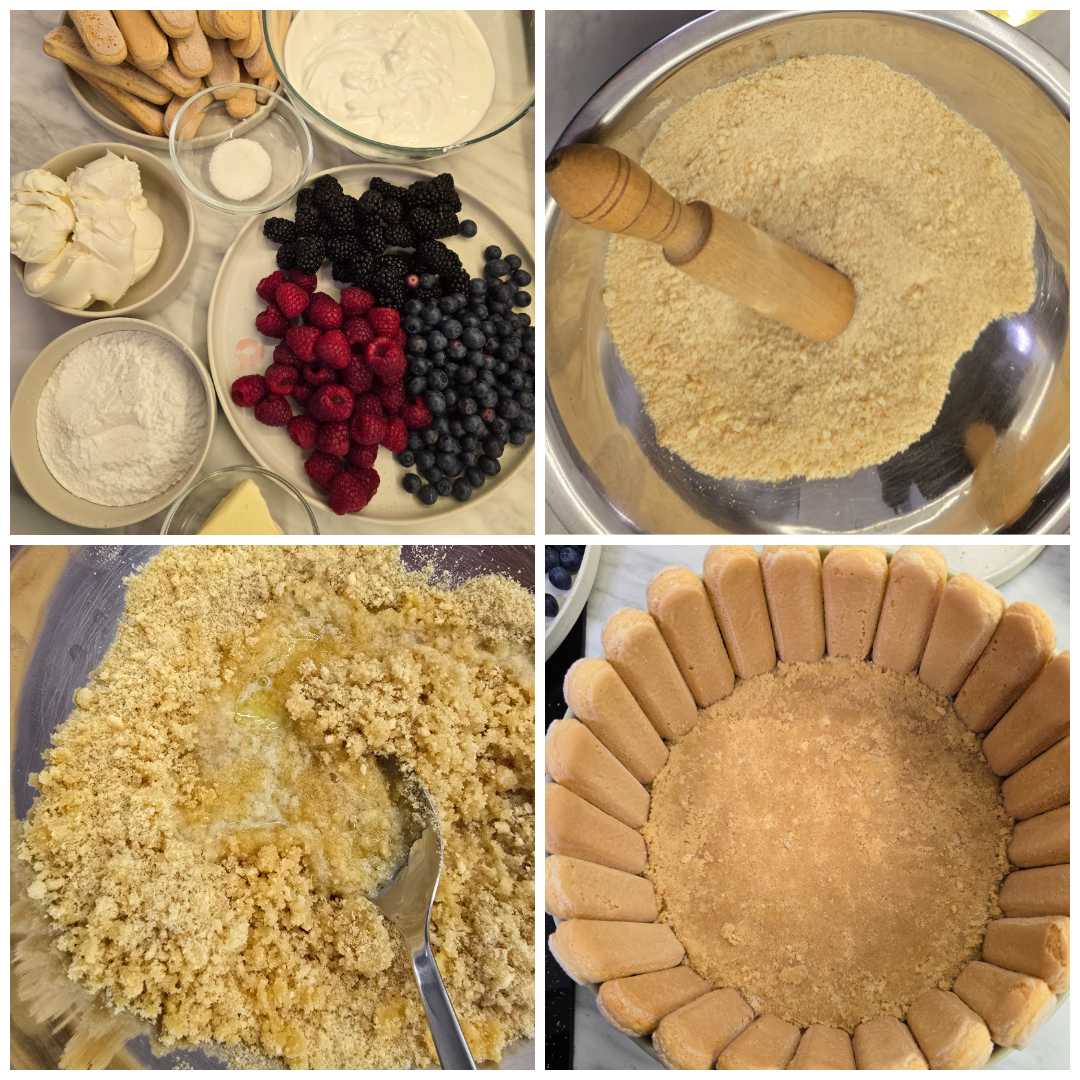
20 ladyfingers (about 200 g), finely crushed
125 g unsalted butter, melted
25 whole ladyfingers for the ring
- For the cream filling
250 g mascarpone cheese
120 g powdered sugar
500 g sour cream (20% fat preferred)
1 tbsp powdered gelatin
3 tbsp cold water
1 tsp blue gel food coloring (optional)
1 tsp vanilla extract (optional but recommended)
- For layering and topping
4 additional ladyfingers, broken into chunks
450 g mixed berries (raspberries, blueberries, blackberries)
Powdered sugar for dusting (optional)
Decorative ribbon (optional)
Directions
- Preparation
Begin by preparing your base. Crush 20 ladyfingers into fine crumbs using a blender or food processor. Transfer them into a mixing bowl and add 125 g of melted butter. Stir thoroughly until all crumbs are evenly moistened and the mixture resembles wet sand.
Prepare a 20 cm (8-inch) springform ring and place it on a sturdy cake board. If you don’t have a board, use the base of the springform pan. Pour the biscuit mixture into the ring and press it down firmly and evenly to form the crust. Make sure to leave a narrow margin along the edge for inserting whole ladyfingers.
Line the inner wall of the ring with 25 upright ladyfingers. Place them side by side, gently pressing into the crust to secure them vertically. The goal is to form a continuous biscuit wall that will hold the cream and berries in place. Once arranged, gently compress the base again to anchor everything together.
- Cream Filling
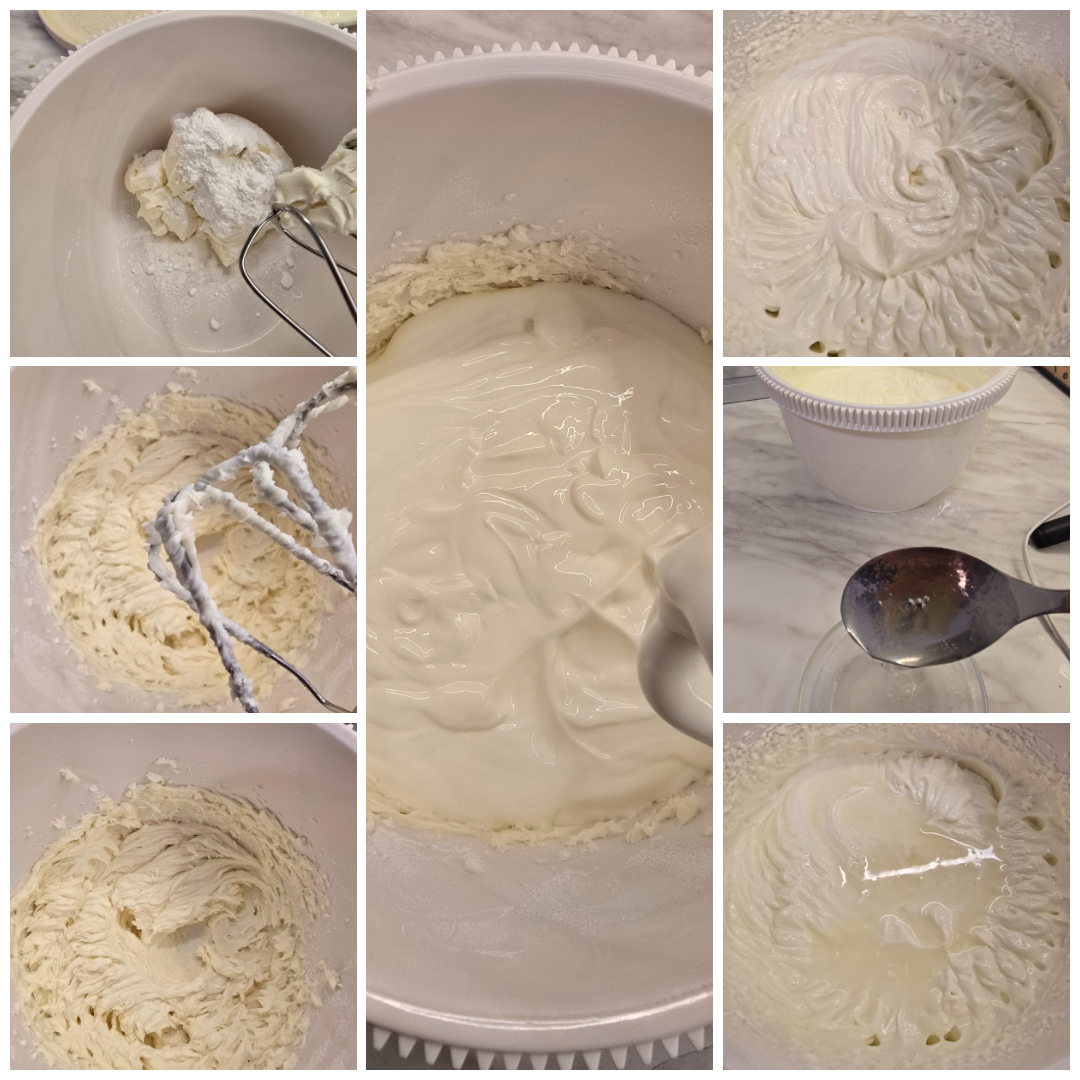
In a small bowl, sprinkle 1 tablespoon of powdered gelatin over 3 tablespoons of cold water. Let it bloom for about 10 minutes. This is essential to ensure a smooth texture in the final cream.
In a large bowl, beat 250 g of mascarpone with 120 g of powdered sugar using an electric mixer. Mix on medium speed until the texture is light and smooth. Add the 500 g of sour cream and continue mixing until fully combined and creamy. At this point, you may add 1 teaspoon of vanilla extract for added aroma and flavor.
Gently melt the bloomed gelatin (you can microwave it for a few seconds or use a hot water bath). Let it cool slightly, then slowly pour it into the mascarpone-sour cream mixture while mixing on low speed. Beat for another minute to ensure it’s fully incorporated.
- Assembly and Finish
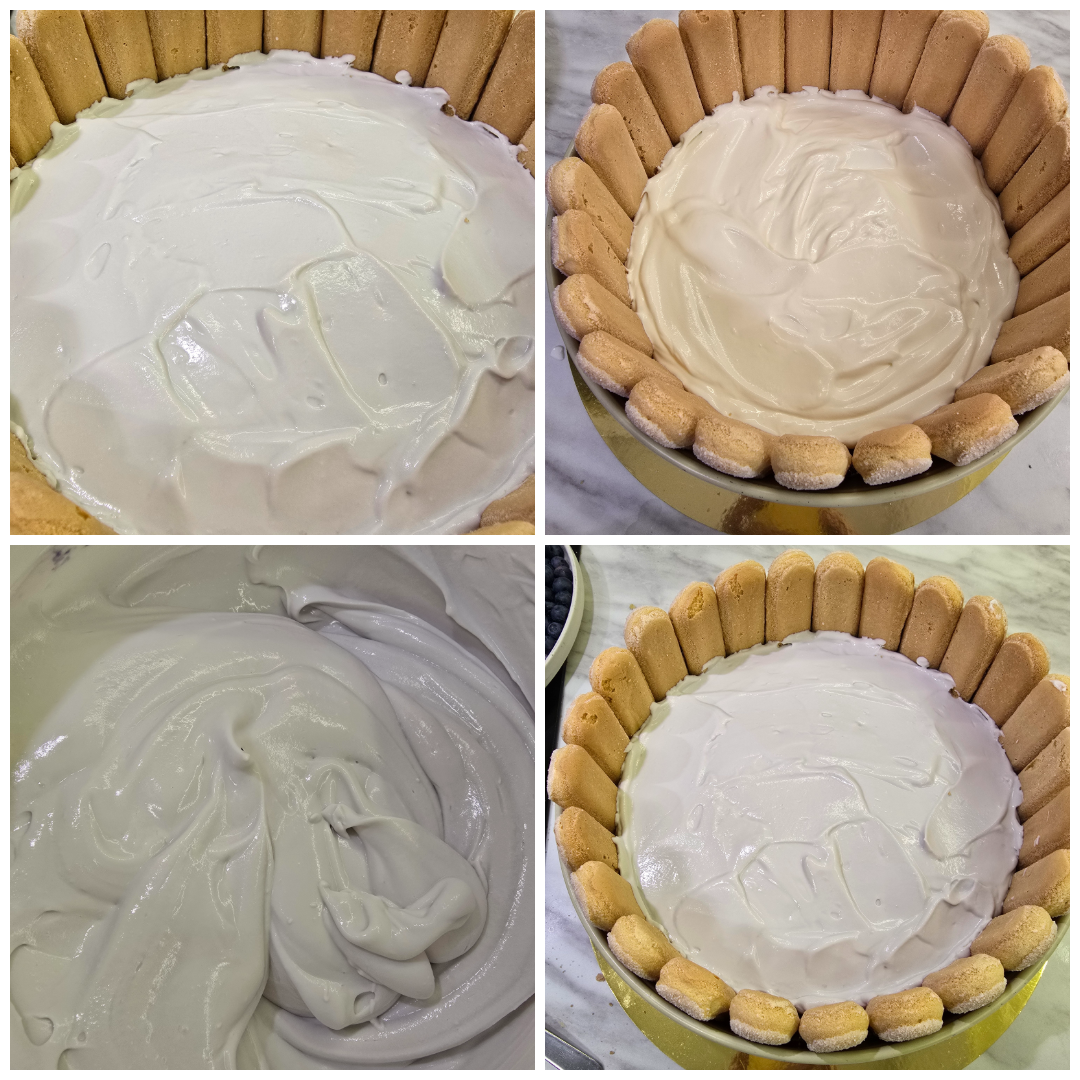
Pour half of the cream mixture into the prepared crust. Use a spatula to spread it evenly. Break 4 ladyfingers into chunks and distribute them over the surface of the cream. Add about 50 g of fresh mixed berries — raspberries, blueberries, and blackberries — arranging them in a single layer.
Color the remaining cream mixture by adding about 1 teaspoon of blue gel food coloring. This step is entirely optional and adjustable based on your preference. Stir until the color is evenly distributed. Pour the tinted cream on top of the fruit and spread gently with a spatula. It doesn’t need to be perfectly smooth, as the final layer of berries will cover it.
Refrigerate the cake for at least 1 hour to allow it to set before topping with the remaining fruit.
- Final Decoration and Serving
After the cream has firmed up slightly, remove the cake from the refrigerator. Arrange the remaining 400 g of mixed berries on top, covering the surface generously and naturally. Return the cake to the fridge and chill for at least 5 more hours, or preferably overnight. This gives the cake enough time to fully stabilize.
When ready to serve, carefully remove the springform ring. Be gentle to avoid disturbing the upright ladyfingers. Wrap a ribbon around the outside of the cake and tie it into a bow. Not only is it beautiful, but it also helps keep the ladyfingers firmly in place.
Just before serving, dust the berries with powdered sugar for a final elegant touch. Slice with a sharp knife and enjoy!
Recipe Video
Notes
- ✅ What to Do
✅ Use firm, dry ladyfingers (savoiardi): Soft or soaked ones will collapse and lose structure.
✅ Let the gelatin bloom properly: This ensures a smooth, lump-free cream.
✅ Chill the cake overnight: This gives the filling time to set and allows the flavors to meld beautifully.
✅ Tie a ribbon around the cake: It’s not just decorative — it helps keep the ladyfingers upright and secure.
❌ What to Avoid
❌ Don’t add warm gelatin to the cold cream: It can create stringy lumps in the mixture.
❌ Don’t use frozen berries without draining them well: Excess moisture can make the filling watery.
❌ Don’t overbeat mascarpone: Overmixing can break its structure and cause a grainy or curdled texture. - ❓ FAQ – Frequently Asked Questions
Can I make this cake ahead of time?
Yes, absolutely! In fact, this cake is best made a day in advance. The longer it chills, the more stable and flavorful it becomes.
Can I use cream cheese instead of mascarpone?
You can, but the flavor will change. Cream cheese is tangier and firmer, while mascarpone is milder and creamier. If substituting, use full-fat cream cheese and beat until smooth.
Is the food coloring necessary?
No — it’s completely optional. The coloring is just for aesthetic effect. You can also use natural alternatives like crushed blueberries or omit it entirely.
What kind of berries work best?
A combination of raspberries, blueberries, and blackberries works beautifully. You can also include sliced strawberries. Make sure all berries are fresh and dry.
Can I freeze the Berry Charlotte Cake?
Freezing is not recommended. The texture of sour cream and mascarpone can become grainy when thawed, and the fresh berries may lose their structure. It’s best enjoyed chilled from the fridge within 2–3 days.
How do I transport the cake safely?
Use a sturdy cake board and wrap the sides with plastic wrap or a tall cake collar. The ribbon helps stabilize the biscuit walls, so tie it firmly. Chill the cake right before transport to help it stay firm.

