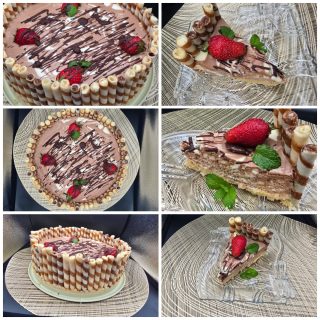
No-Bake Ladyfinger Cake with Cream Cheese & Nutella is a creamy, no-bake dessert with a crunchy base and beautiful zebra pattern. This easy cake combines cream cheese, chocolate, and delicate ladyfingers for a rich and impressive result perfect for any occasion.

Amazing No-bake Ladyfinger Cake with Cream Cheese & Nutella
Course: DessertCuisine: EuropeanDifficulty: Medium10
servings25
minutes9
hours420
kcalThis No-Bake Ladyfinger Cake is the kind of dessert that immediately catches attention—not only with its elegant look but also with its perfectly balanced textures and flavors. It combines a buttery, slightly crunchy base made from finely crushed ladyfingers, a rich and airy cream filling, and a visually stunning zebra pattern that forms naturally during assembly. The contrast between the light vanilla cream and the chocolate layer creates a marbled effect that looks impressive without requiring complicated techniques.
What makes this cake truly special is how approachable it is. There is no need for baking, no complicated temperature control, and no advanced pastry skills. Everything comes together with simple steps and basic tools, making it ideal even for beginners. At the same time, the final result looks like something from a professional pastry shop.
The cream is built around smooth Cream cheese, which gives structure and a slight tanginess that balances the sweetness. The addition of Nutella creates depth and a rich chocolate flavor, while the condensed milk adds silkiness and enhances the overall creaminess. The decorative wafer rolls around the edges not only add visual appeal but also introduce a light crunch that contrasts beautifully with the soft filling.
Inspired by desserts like Tiramisu, this cake transforms simple ingredients into a layered, elegant dessert that is perfect for celebrations, family gatherings, or simply when you want to impress without spending hours in the kitchen.
Kitchen Tools Used
You will need a blender (recommended over a mortar for finer crumbs), a 26 cm springform cake pan, a hand mixer, mixing bowls, spatula, ladle, and optionally a knife or skewer for creating the marble effect.
Ingredients
120 g Butter (melted)
200 g Wafer rolls
200 g Ladyfingers
400 g Cream cheese
200 ml Heavy cream
100 g Powdered sugar
150 g Chocolate Nutella
100 ml Condensed milk
Melted chocolate for decoration
Fresh strawberries
Directions
- Preparation
Start by transforming the ladyfingers into a fine, sand-like texture. While a mortar can be used, a blender is strongly recommended because it creates a much more even crumb, which leads to a smoother and more stable base. Once the crumbs are ready, transfer them into a large bowl. Melt the butter until fully liquid but not too hot, then pour it over the crumbs. Mix thoroughly until every part of the mixture is evenly coated and resembles wet sand.
Prepare a 26 cm springform pan and pour the mixture inside. Spread it evenly across the bottom, making sure there are no gaps. Using the bottom of a glass, press firmly to compact the base. This step is essential because it ensures the cake will hold its shape when sliced. Take your time to press evenly, especially around the edges. Once done, set the base aside and allow it to firm up slightly while you prepare the rest.
- Cream Preparation
In a large mixing bowl, pour the cold heavy cream and add the powdered sugar. Using a hand mixer, beat the mixture for about 3 minutes until it becomes light, fluffy, and forms soft peaks. This step creates the airy structure of the cream.
Next, add the cream cheese. It should be at room temperature to ensure a smooth blend. Continue mixing for about 1 minute until the mixture becomes silky and uniform, without lumps. Be careful not to overmix, as this can cause the cream to lose its light texture.
Divide the cream evenly into two separate bowls. In the first bowl, add the Nutella and mix gently until fully incorporated and smooth. In the second bowl, add the condensed milk and mix until creamy and homogeneous. At this stage, you will have two distinct creams: one light and one chocolate, both soft and easy to pour. - Finishing
Return to the prepared cake base. Begin by arranging the wafer rolls vertically along the inner edge of the pan. If they are too tall, trim them slightly so they sit just above the rim without sticking out too much. Place them tightly next to each other and press them gently into the base to secure them.
To create the signature zebra pattern, start assembling the filling. Using a ladle, pour one scoop of the white cream directly into the center of the base. Then, pour one scoop of the chocolate cream directly into the center of the white layer. The weight of each layer will naturally push the previous one outward, forming rings.
Continue alternating between the two creams, always pouring into the center. This technique creates the beautiful striped pattern without needing to spread anything manually. Once all the cream is used, gently tap or shake the pan to level the surface evenly.
For an extra decorative effect, take a knife or skewer and lightly drag it across the surface in a few lines to create a subtle marble pattern. Do not overdo this step, as it can blur the zebra effect. - Serving
Place the cake in the refrigerator and allow it to chill for at least 8 hours, preferably overnight. This resting time is crucial because it allows the cream to set properly and the flavors to blend together.
Before serving, carefully remove the cake from the springform pan. Decorate the top with fresh strawberries for color and freshness. Drizzle melted chocolate over the surface in thin, elegant lines. For a more refined finish, you can use a sieve to create a delicate pattern. Add a few mint leaves for a fresh contrast.
Slice the cake using a sharp knife, wiping it clean between cuts for neat portions. Serve chilled and enjoy the creamy texture combined with the slight crunch from the wafer rolls.


Recipe Video
Notes
- ✅ Do
✅ Press the base firmly and evenly
✅Use cold cream for whipping
✅ Assemble layers slowly for a better pattern - ❌ Don’t
❌ Do not rush the chilling process
❌ Do not use low-fat ingredients
❌ Do not overwork the cream - FAQ
Can I use different biscuits?
Yes, digestive biscuits are a great alternative.
Can I replace Nutella?
You can use any chocolate spread or melted chocolate.
How long can it be stored?
Up to 3 days in the refrigerator.
Can I make it ahead?
Yes, it is actually better when made a day in advance.